February 11, 2026 / by Fortify Labs / In connected vehicles, vehicles, technical, Ford Ranger, forensics
Behind the Dashboard: Part 4
Powering SYNC® 3 in the Lab
Welcome to the fifth post in our blog series:
Behind the Dashboard: Where the Data Lives – Inside the SYNC® 3 Filesystem – Ford Ranger
In Parts 1 to 3, we introduced the project, examined the data recovered from the salvaged SYNC® 3 unit, and explored where Bluetooth, GPS, WiFi and driving‑related artefacts are stored within the filesystem.
Now, in Part 4, we move from static analysis to hands‑on work, powering the SYNC® 3 head unit on the bench. Here, we demonstrate how to power on the unit outside the vehicle, walk through our methodology, and provide details on the steps taken.
To keep things clear and focused, here’s the series timeline:
Overview of strategy, vehicle selection, and introduction to SYNC® 3.
A review of the data we extracted and analyzed.
Where the Bluetooth Device data lives in the file system and the formats used.
Where the GPS, WiFi and driving data lives in the file system and the formats used.
This post: How to run the infotainment system outside the vehicle.
Methods and tools used to access and read the memory chip.
What does, and more importantly does not, get erased after a "factory reset.
Table Of Contents
- Table Of Contents
- Observations
- Research Summary
- Short Procedure to Power on Unit
- Fortify Labs Github Repository
- Disclaimer
Observations
We successfully powered on the Ranger’s SYNC® 3 Infotainment system on the bench and made the following observations throughout our research:
-
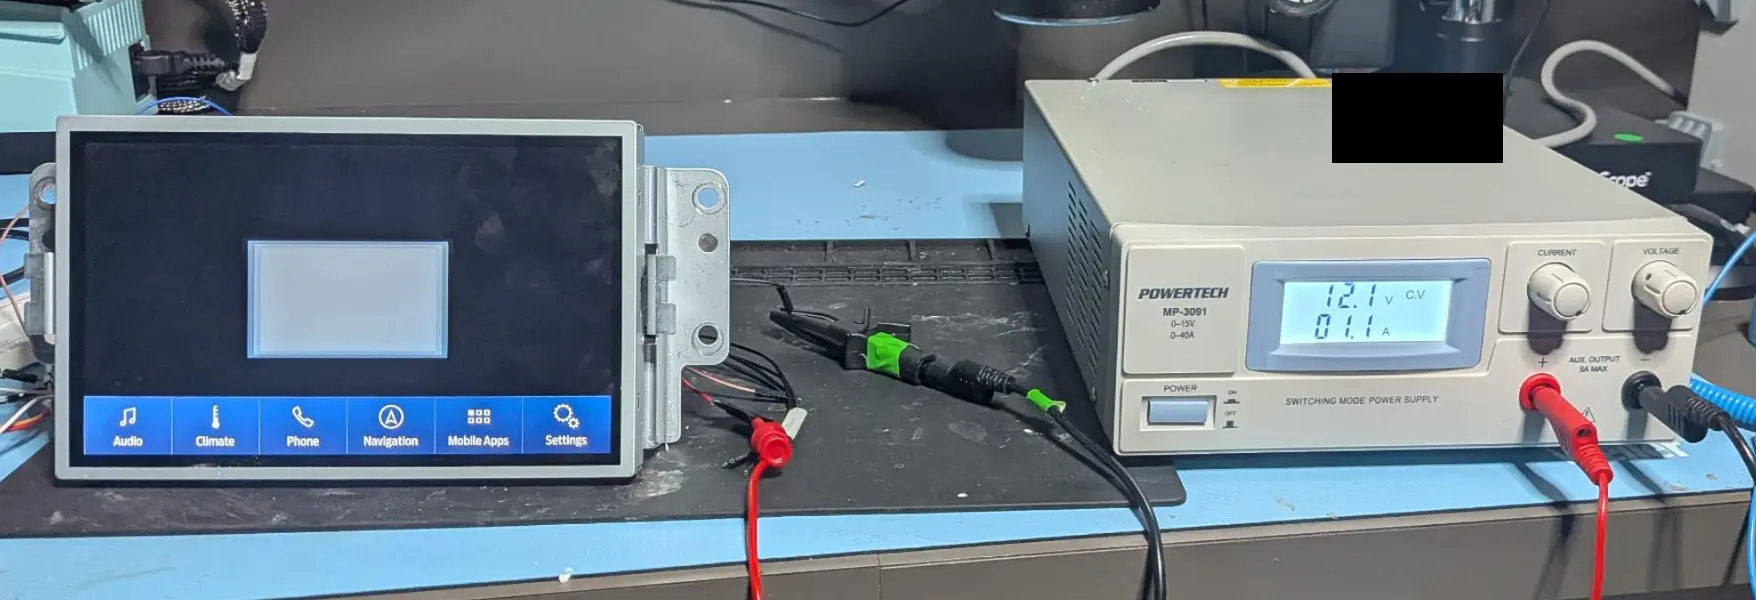
The wrecked infotainment system needed more than 3 Amps to properly power on. A power supply capable of supplying 5 Amps was required.
-
Different SYNC® 3 Infotainment systems required different CAN messages sequences to power on.
-
The SYNC® 3 system is provided with constant 12v power.
-
Basic functionality of SYNC® 3 system appears to be controlled by CAN messages on
Pins 19/20only. The other CAN connections (i.e.Pins 41/42andPins 53/54) were not required to power on the infotainment unit. -
When powering off the vehicle, the infotainment system appears to go into standby mode with the screen going blank, but is still listening to CAN messages.
-
After going to sleep, the infotainment system continues to receive CAN messages from the vehicle for approx. 4 minutes after turning off the ignition.
Equipment used:
| Item | Version | Note | Link |
|---|---|---|---|
| Laptop | OS: Ubuntu 24.04.3 LTS | Ubuntu Download Site | |
| can-utils | 2023.03-1 | Collection of CAN (Controller Area Network) utilities for Linux | can-utils - Linux SocketCAN userspace utilities |
| Inno-Maker USB2CAN Cable | N/A | USB to CAN device used to capture and replay CAN messages. | Inno-Maker Website |
| Bench Power Supply | N/A | Capable of supplying 5A. |
Possible Follow-Up Work
Determine:
- Specific CAN messages required to power on and shut down each specific version of SYNC® 3 Infotainment system.
- Specific CAN messages required to enable/disable certain functionality (i.e. identify the messages that indicate the vehicle is in gear or moving that disables certain functionality).
- Specific CAN messages required to enable/disable dark & light mode on the system.
- How the climate control system is integrated into the infotainment system.
- Specific CAN messages required to power down the system.
Research Summary
In order to power on the SYNC® 3 Infotainment system in the Lab we performed the following:
Power Testing
Note: We used a personal vehicle (Ford Ranger) to perform the following testing.
-
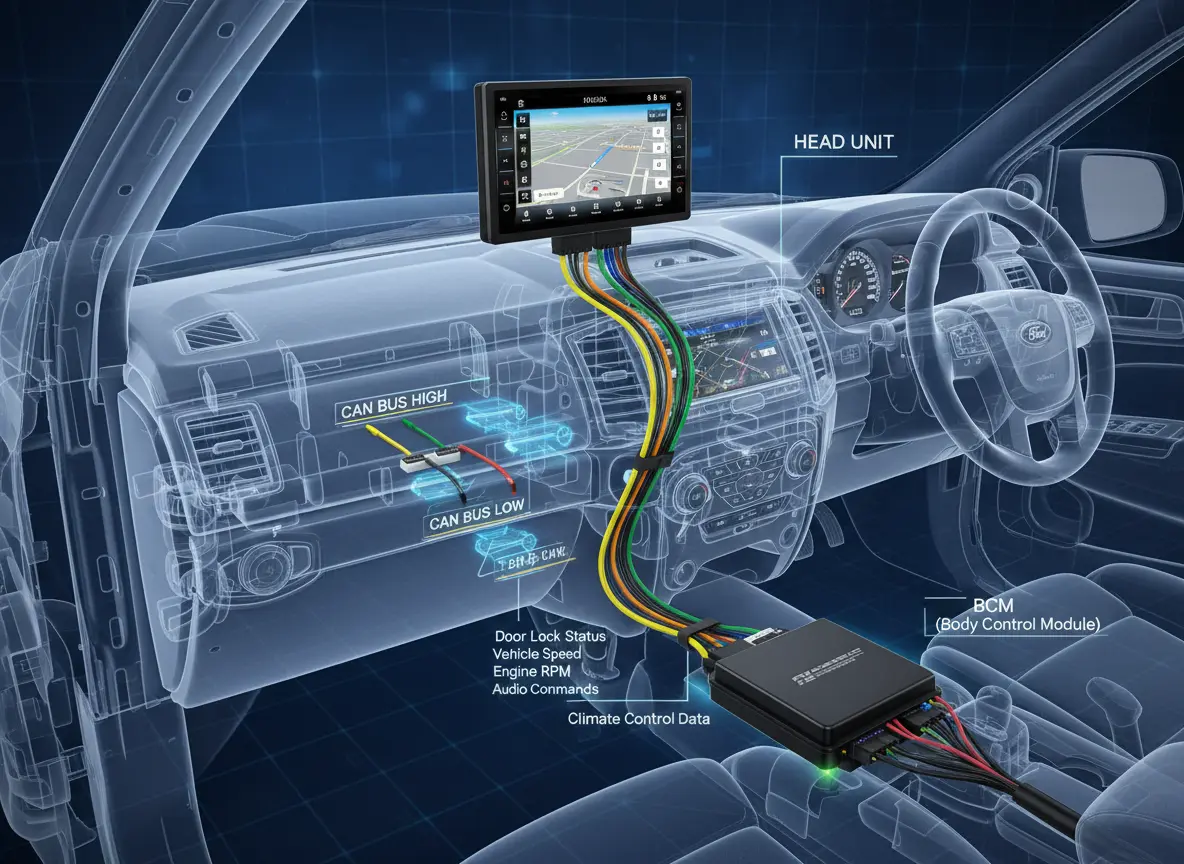
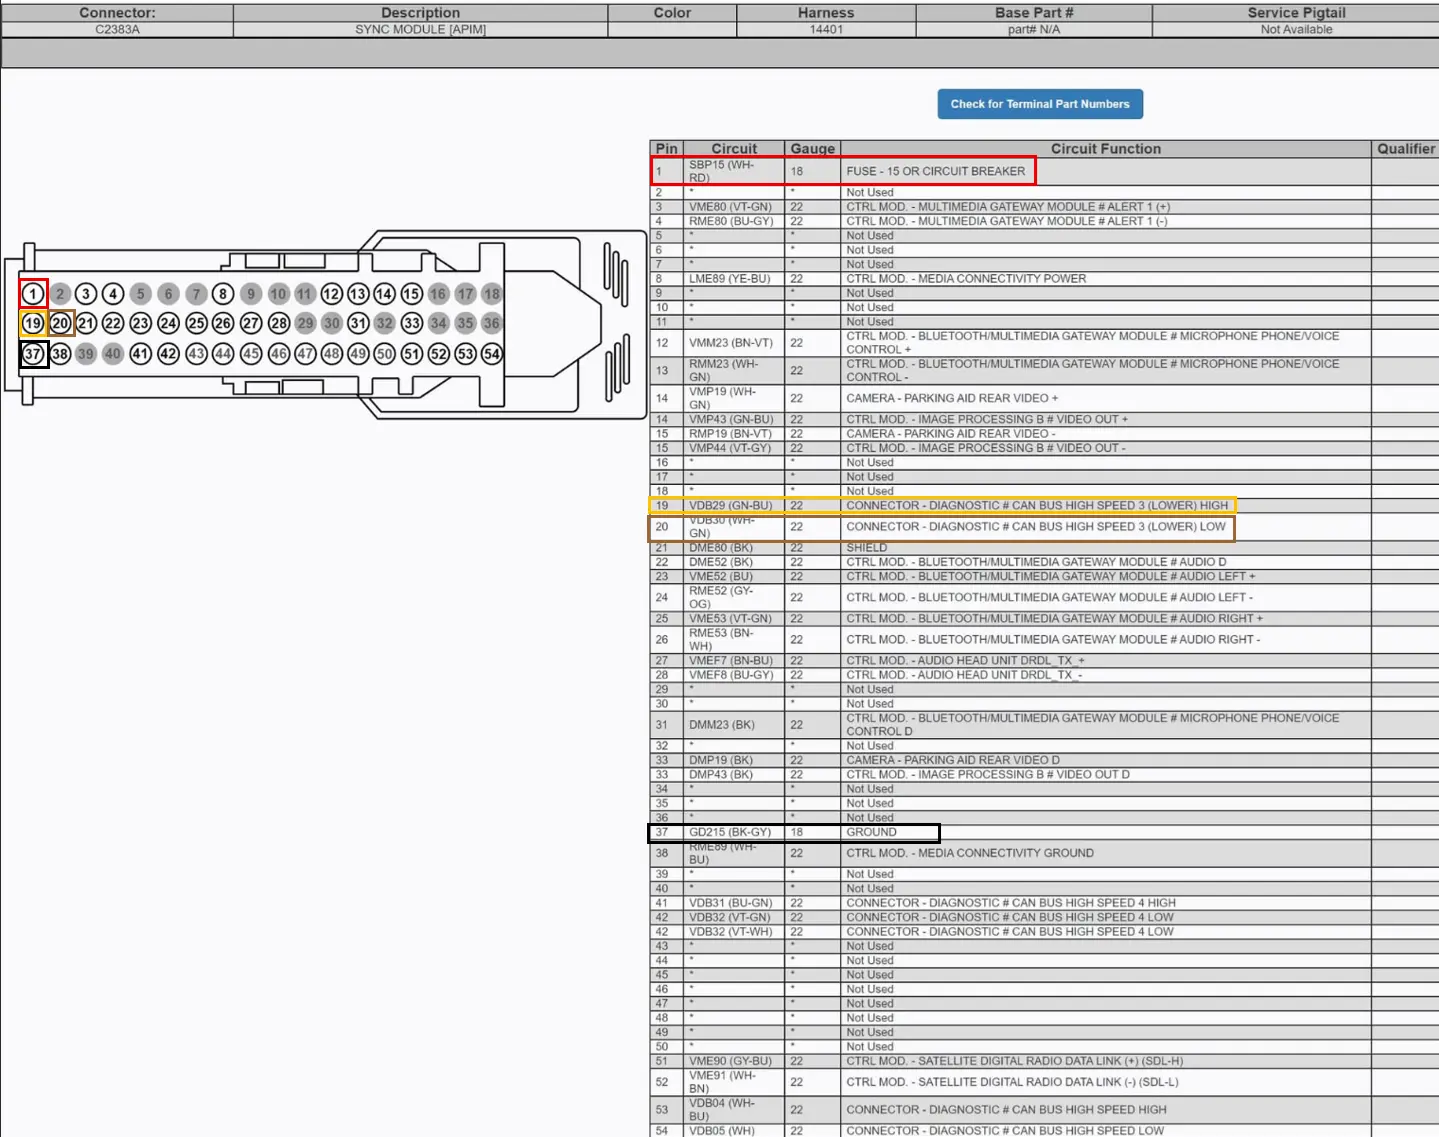
Found a Pin-Out diagram of the SYNC® 3 Infotainment system’s main connector using open source searches.
Note: The Pin Out diagram was found from this post from CyanLabs.
-
Ensuring that the diagram pins was consistent with our donor/test vehicle, we:
-
Verified that
pin 37(GND) had electrical continuity between it and a chassis grounding point. -
Verified that
pin 1(12v) topin 37(GND) connections were consistent with a constant 12v (Battery +) connection.-
Note: Approx. 11.8v when the vehicle was off and over 12v when the vehicle was running.
-
-
Verified that
pin 19(CAN H) topin 37(GND) showed a fluctuating voltage from approximately 2.6v - 2.8v when the vehicle was running (consistent with CAN bus readings).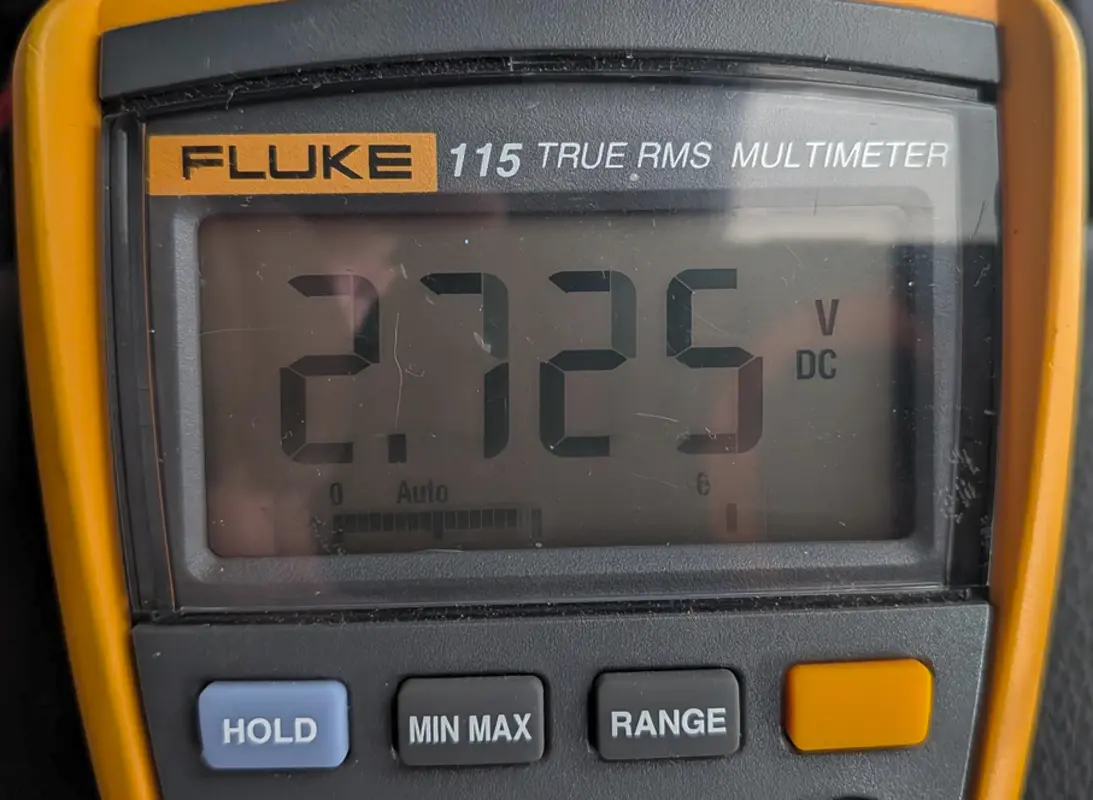
-
Verified that
pin 20(CAN L) topin 37(GND) showed a fluctuating voltage from approximately 2.2v - 2.4v when the vehicle was running (consistent with CAN bus readings).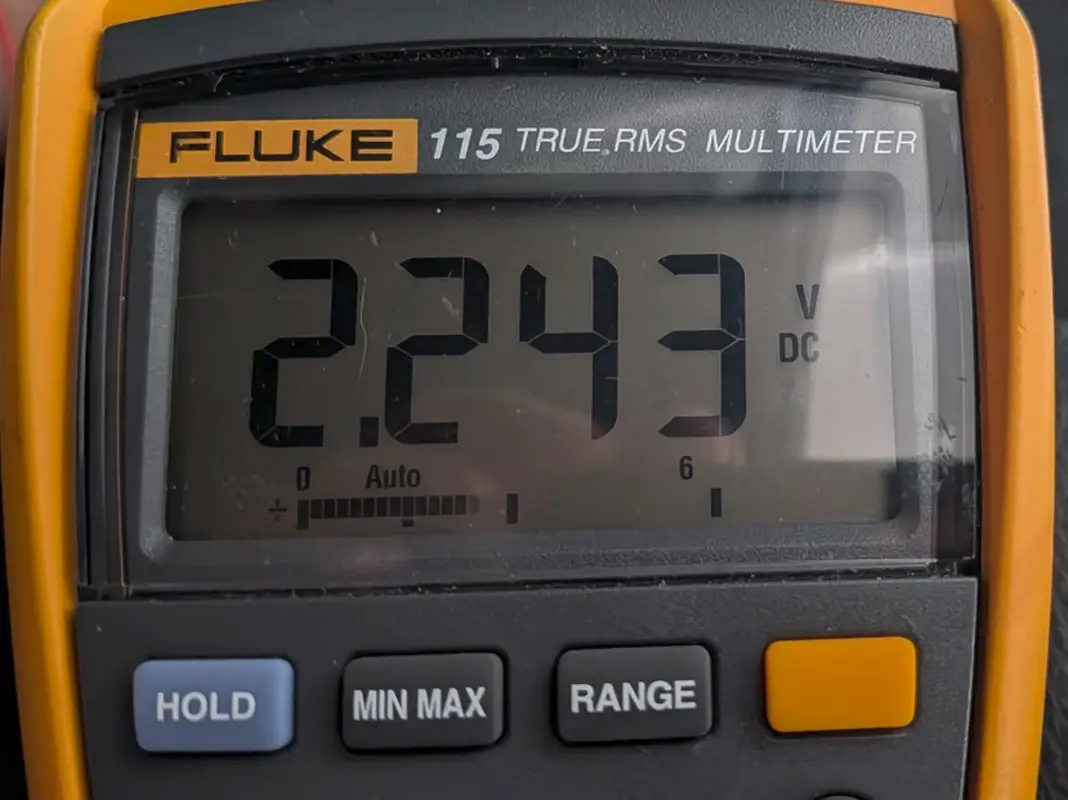
-
Used the donor vehicle to capture CAN messages coming from the vehicle to the SYNC® 3 connector. With the infotainment system removed, we captured CAN messages for approximately 4 minutes of run time while the vehicle ignition was turned on. The capture continued until the CAN messages stopped (approx. 4 mins after powering off the ignition).
-
The command used to capture CAN messages:
 # Install can-utils
 $ sudo apt install can-utils -y

 # The following commands were used to initialize the USB2CAN Device
 sudo ip link set can0 up type can bitrate 500000
 sudo ifconfig can0 txqueuelen 100000

 # Monitor CAN traffic in the terminal window
 $ candump can0

 # Capture CAN messages to a log file from the can0 interface
 # This will save the output log file as 'candump-yyyy-mm-dd_hhmmss.log'
 $ candump -l can0

 # Renaming the capture file
 $ cp candump-yyyy-mm-dd_hhmmss.log can-capture-vehicle-on-4mins-off.log
-
-
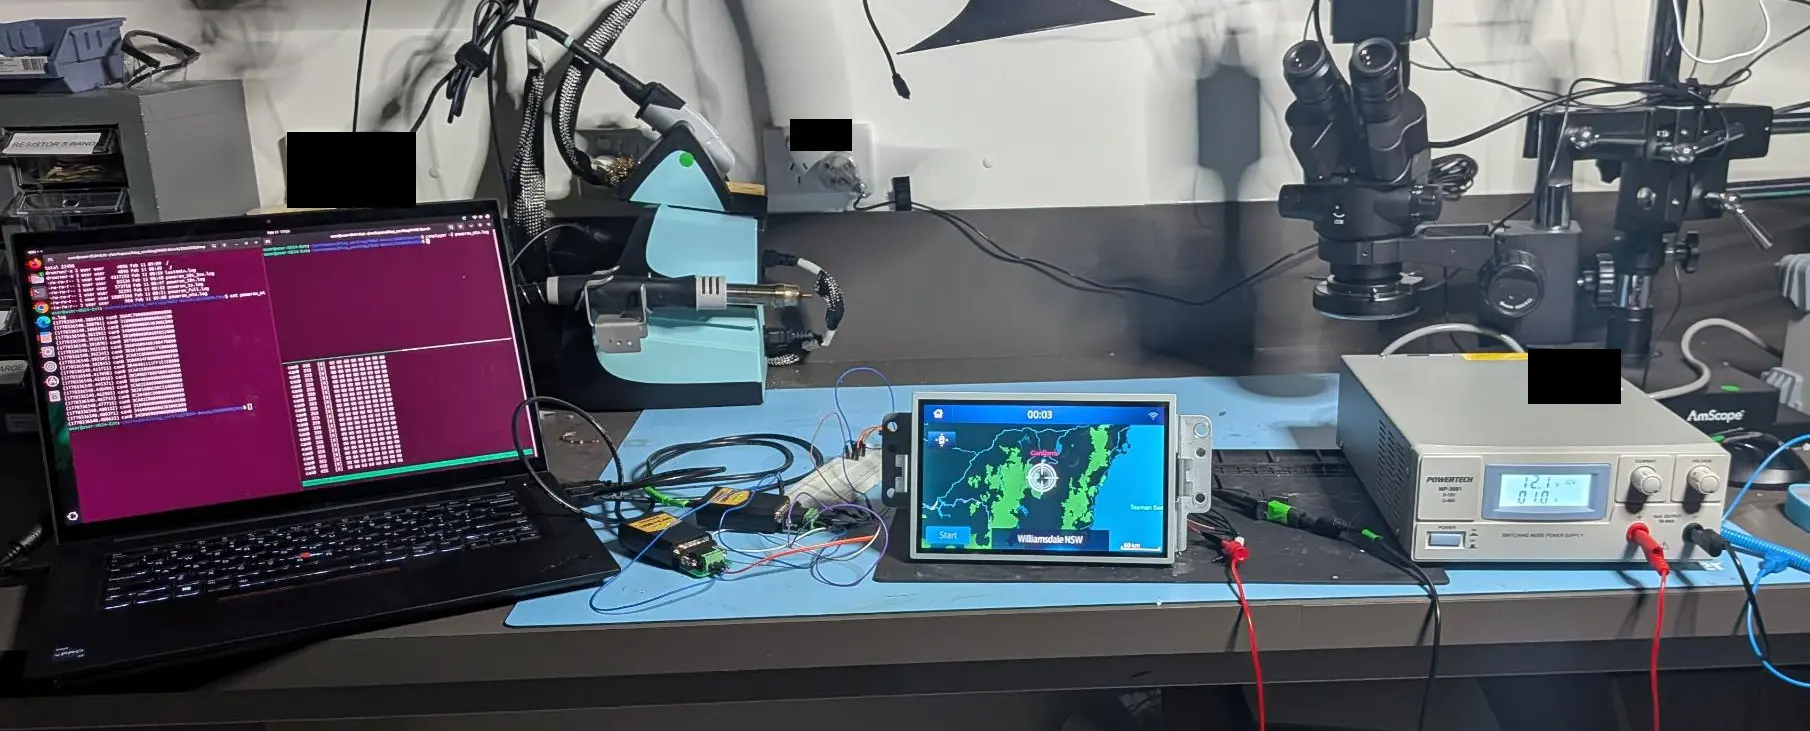
Setup the wrecked infotainment System on the Lab bench. Connected the following Pins:
Function Pin Power (12v, 5A) 1 Ground 37 CAN High 19 CAN Low 20 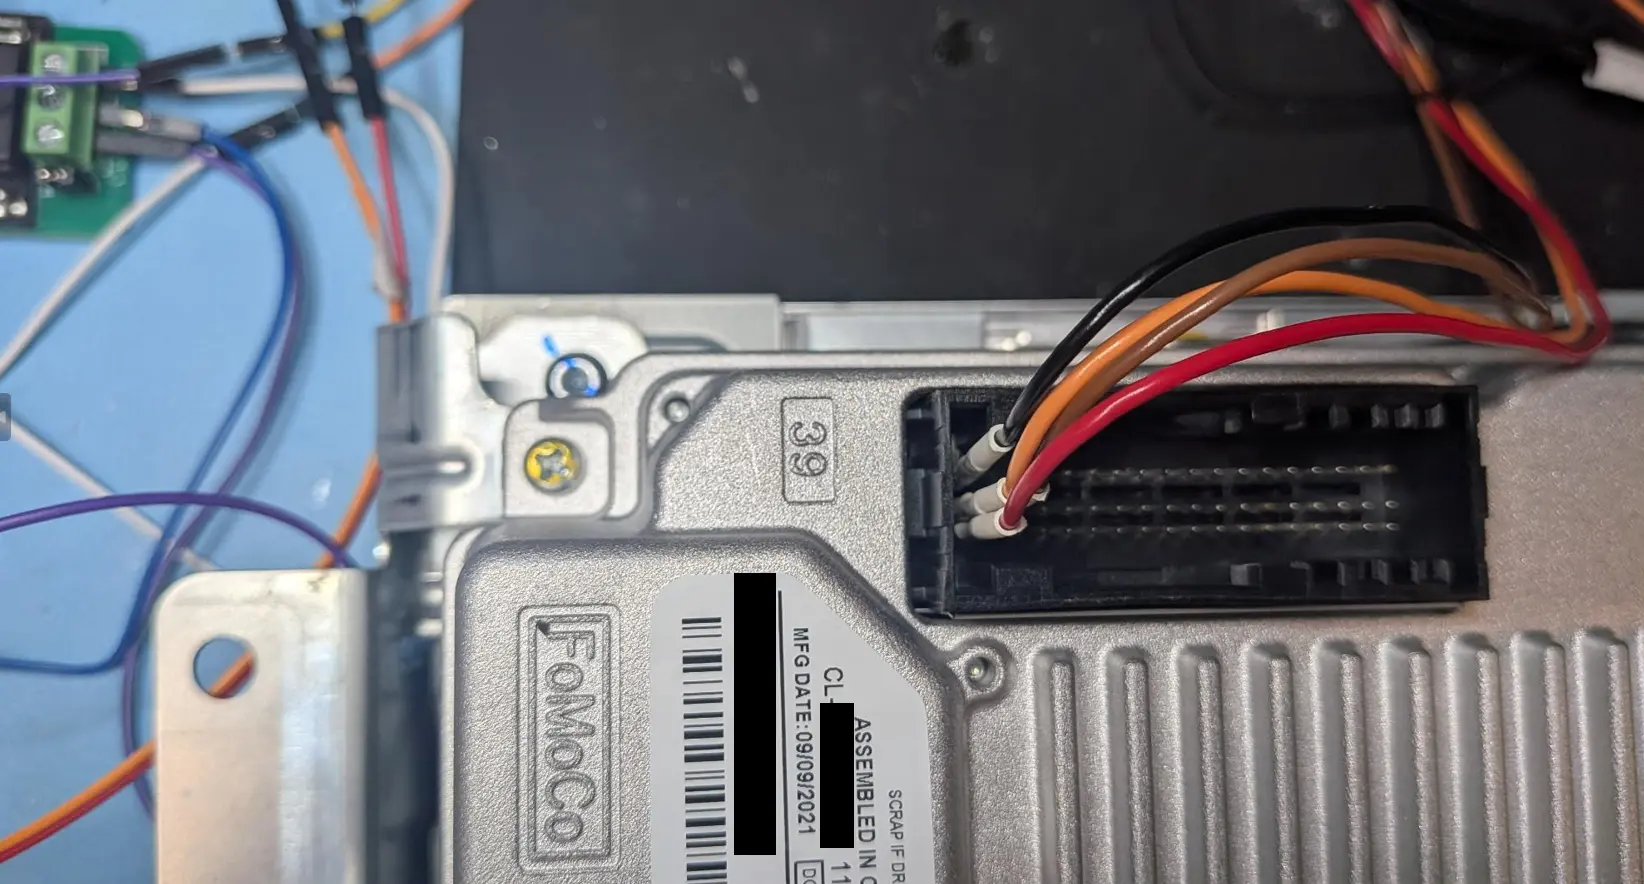
Note: We experienced issues connecting the SYNC® 3 Infotainment system to a power supply with a limit of 3 Amps where the infotainment system would not boot properly. We found we had to use a power supply that was capable of supplying 5 Amps for the wrecked head unit to power on.
-
Powered on the Power Supply.
-
Used
canplayer(can-utils) to replay the capture of CAN messages obtained from the donor vehicle.
- This successfully powered on the infotainment system.
- If we replayed the capture in full (i.e. from vehicle power on to power off), the head unit also powered down at towards the end of the CAN capture.
-
The command used to replay the CAN capture:
canplayer -I can-capture-vehicle-on-4mins-off.log
Narrowing down the CAN messages
- We started with the full capture that we captured from the vehicle.
- We knew from testing that powering on the head unit would occur very soon after starting the replay.
- In an attempt to cut down the required number of CAN messages required to power on the head unit we:
-
Examined the CAN Capture’s message format. For example:
  (1770336455.092014) can0 04C#20A57F1E00000000
  (1770336455.093539) can0 3CA#6F80000000000000
  (1770336455.095489) can0 3A8#010027DF00000000
  (1770336455.097220) can0 171#1400000000000000
  (1770336455.098169) can0 156#6300000003000000
  (1770336455.098414) can0 163#0000000096000000
  (1770336455.099114) can0 166#79000016AB590000
  (1770336455.099365) can0 167#727FFF10001A0F00
  (1770336455.100161) can0 175#0000000000000BB8
  (1770336455.100316) can0 178#000002000E5CB656
- The first field is a Unix timestamp with microsecond precision.
-
To cut down the capture we used the timestamp field from the first message in the CAN capture. For example:
(1770336455.093539) can0 3CA#6F80000000000000 Timestamp with Second precision = 1770336455 -
To convert it to human readable:
  $ date -d @1770336455
  Fri Feb  6 11:07:35 AEDT 2026

  # We could now determine that increasing the last digit of the timestamp (before the decimal place) by one, would increase the capture by 1 second.
- Now we could narrow the full CAN message capture by using these timestamps.
-
The following commands could be used and modified using the timestamps to narrow down each CAN message capture.
  # Extract the first 60 seconds
  # 1770336455 + 60 = 1770336515
  awk -F'[()]' '$2 >= 1770336455 && $2 < 1770336515' can-capture-vehicle-on-4mins-off.log > can-first60s.log

  # Extract the last 90 seconds
  # Last timestamp
  # (1770336765.608752) can0 3CA#0480000000000000
  # 1770336765 - 90 = 1770336675 (note that the command below ensures we capture the last messages by increasing the end timestamp by 1 to 1770336766)

  $ awk -F'[()]' '$2 >= 1770336675 && $2 <= 1770336766' can-capture-vehicle-on-4mins-off.log > can-last90s.log
-
At each stage, we powered down the head unit and continued to replay the narrowed CAN message logs until we were left with a short timeframe to work with.
-
Based on other Github projects analysing Ford CAN messages (such as: https://github.com/v-ivanyshyn/parse_can_logs), we theorized that the infotainment system was monitoring the
0x3XXCAN IDs. These IDs appear to be associated to body control and infotainment functions. -
We used the
greputility to extract only messages from CAN ID0x3xxwith a command similar to:
  # Extract only messages with CAN IDs starting with 0x3xx

  $ grep "can0 0x3" can-last90s.log > can-last90s-only-0x3xx.log
- We extracted only the
0x3XXCAN IDs from the CAN capture log and continued to narrow down the required CAN messages to the following messages, which we saved the log to a file calledpoweron.log.
  (1770336540.380455) can0 30A#C700000000000000
  (1770336540.380701) can0 318#00000000000AAE00
  (1770336540.380845) can0 346#000000030300C000
  (1770336540.381595) can0 348#0000000000000000
  (1770336540.391619) can0 303#000008060E052000
  (1770336540.391870) can0 307#0600000000000000
  (1770336540.392120) can0 38A#4000400100470000
  (1770336540.392345) can0 3B3#1080000CFE000000
  (1770336540.392595) can0 3CA#2E80000000000000
  (1770336540.392845) can0 3D0#034F000088000F89
  (1770336540.413723) can0 3B4#401111FF1E1E0000
  (1770336540.417698) can0 3CA#2E80000000000000
  (1770336540.423056) can0 3B5#00D700D500E600E8
  (1770336540.445371) can0 3E8#4088000000000000
  (1770336540.448496) can0 3CA#2E80000000000000
  (1770336540.462985) can0 3B2#1080C00CE6000002
  (1770336540.465743) can0 3C3#400C000000008000
  (1770336540.477715) can0 3CA#2E80000000000000
  (1770336540.480122) can0 318#00000000000AAE00
  (1770336540.480371) can0 346#000000030300C000
  (1770336540.480622) can0 348#0000000000000000
- We could then power on the system by running:
$ canplayer -I poweron.log
Note: We noticed that the SYNC® 3 systems from PX3 Rangers required different CAN messages to power on. As such, this specific capture may not work for all SYNC® 3 units. If you are attempting this and do not have access to a donor Ford Ranger, please contact us and can attempt to assist.
- We verified some of the system functionality while powered on:
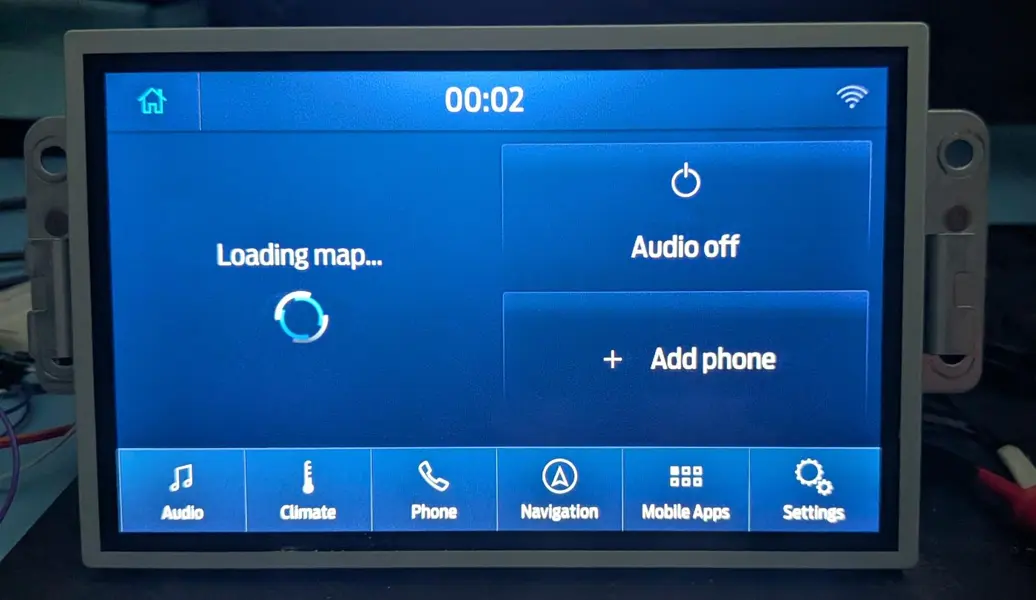
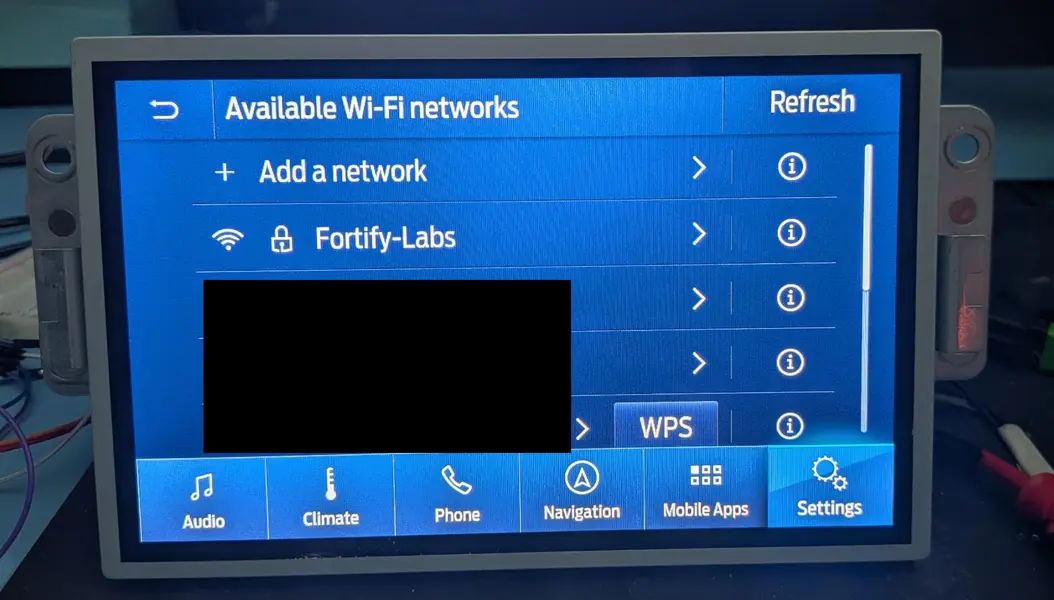
-
Short Procedure to Power on Unit
Visit our Fortify Labs Automotive Forensics Github repository - Ford Sync CAN
-
Connect Infotainment Unit to Power Supply Pins as follows:
Function Pin Power 1 Ground 37 CAN High 19 CAN Low 20 Note: Ensure power supply is capable of supplying 5 Amps.
-
Install can-utils and initialize the USB2CAN device.
   # Install can-utils
   $ sudo apt install can-utils -y

   # The following commands were used to initialize the USB2CAN Device
   sudo ip link set can0 up type can bitrate 500000
   sudo ifconfig can0 txqueuelen 100000

   # Monitor CAN traffic in the terminal window
   $ candump can0

   # Capture CAN messages to a log file from the can0 interface
   # This will save the output log file as 'candump-yyyy-mm-dd_hhmmss.log'
   $ candump -l can0
-
Save the following CAN messages to a log file and play it with
canplayer:-
CAN messages to be played:
  (1770336540.380455) can0 30A#C700000000000000
  (1770336540.380701) can0 318#00000000000AAE00
  (1770336540.380845) can0 346#000000030300C000
  (1770336540.381595) can0 348#0000000000000000
  (1770336540.391619) can0 303#000008060E052000
  (1770336540.391870) can0 307#0600000000000000
  (1770336540.392120) can0 38A#4000400100470000
  (1770336540.392345) can0 3B3#1080000CFE000000
  (1770336540.392595) can0 3CA#2E80000000000000
  (1770336540.392845) can0 3D0#034F000088000F89
  (1770336540.413723) can0 3B4#401111FF1E1E0000
  (1770336540.417698) can0 3CA#2E80000000000000
  (1770336540.423056) can0 3B5#00D700D500E600E8
  (1770336540.445371) can0 3E8#4088000000000000
  (1770336540.448496) can0 3CA#2E80000000000000
  (1770336540.462985) can0 3B2#1080C00CE6000002
  (1770336540.465743) can0 3C3#400C000000008000
  (1770336540.477715) can0 3CA#2E80000000000000
  (1770336540.480122) can0 318#00000000000AAE00
  (1770336540.480371) can0 346#000000030300C000
  (1770336540.480622) can0 348#0000000000000000
-
Using
canplayerto start the system.$ canplayer -I poweron.log
-
-
The head unit should now be powered on.
Fortify Labs Github Repository
Please visit our Fortify Labs Automotive Forensics Github repository for additional tools related to our Automotive research.
Disclaimer
This analysis is based on our professional experience and reflects our best interpretation of the results.
Anyone choosing to replicate these procedures does so at their own risk.
Disassembling a vehicle (or components) and interacting directly with its electronic components carries an inherent risk of damage to the vehicle or its systems. Fortify Labs does not guarantee that any procedure described will be free of risk, nor do we accept responsibility for any resulting damage.